1 Spray bottle with a water and baby shampoo mix 5ml per 700 to 800ml of water (tea spoon) in a spray bottle
1 invisiFRAME Squeegee
2 Clean lint free cloths
Degreaser / panel wipe / tar and glue remover
Application overview
Clean bike, clean hand and a clean work area. Degrease your frame. It is important to remove any contaminates such as oil, grease etc.
Next identify the correct shape you need, using the shape key.
Spray plenty of the water solution on to the bike part you are protecting first.
Wet your fingers, then peel off the shape required and spray well the adhesive side.
Apply to the bike part and slide into position. Spray more solution to the top surface to help the squeegee.
Use the squeegee with short strokes from the middle outwards to remove the excess water. You can remove and reposition the sticker at this point as the adhesive has not yet transferred to the frame.
Perform these steps with the remaining shapes. Leave for 24 hours, check all edges are firmly pressed down and your bike is now protected.
Tips
Fit kits in temperatures above 18 degrees Celsius.
Wet your fingers before touching the sticky side to help prevent finger prints.
Reduce the soap content in the solution to speed up adhesion.
If you are really not confident after reading these instructions, maybe consider taking it to an invisiFRAME stockist to have the kit fitted.
Fitting and tips recap
Clean the frame using a solvent degreaser. Probably the easiest form of solvent degreaser to get hold of is the Autoglym intensive tar remover 325ml available at motor vehicle accessory shops.
Start off with 5ml of baby shampoo in a 1ltr spray bottle of water.
Soak your fingers, the part of the bike you are fitting the part to and both sides of the polyurethane
Float in to place and align – if necessary pull the part off and re soak with the solution to allow you more time to get the right position.
The baby shampoo is the element that stops the adhesive transferring to the bike straight away so adjust the water to soap ratio if necessary i.e. 1 drop more soap to slow the transfer and stop the part locking in to place or less soap to speed up the adhesive transfer and make the part adhere quicker.
You’ll know if you have too much soap in the water because you’ll be squeegeeing forever, better this than the part going down too quick and locking air and bubbles in.
Squeegee, squeegee, squeegee! Make lots of passes with the squeegee overlapping the strokes. Pay particular attention to edges, it is easy to rush these and lock water in.
Start off with the stays first.
Press the edges home after 24 hours.
Removal
Do not pull off the film. Should you need to remove/replace the protection film, use a hair dryer to soften the adhesive and then remove at an obtuse angle. Stretching the film helps sheer the adhesive off.
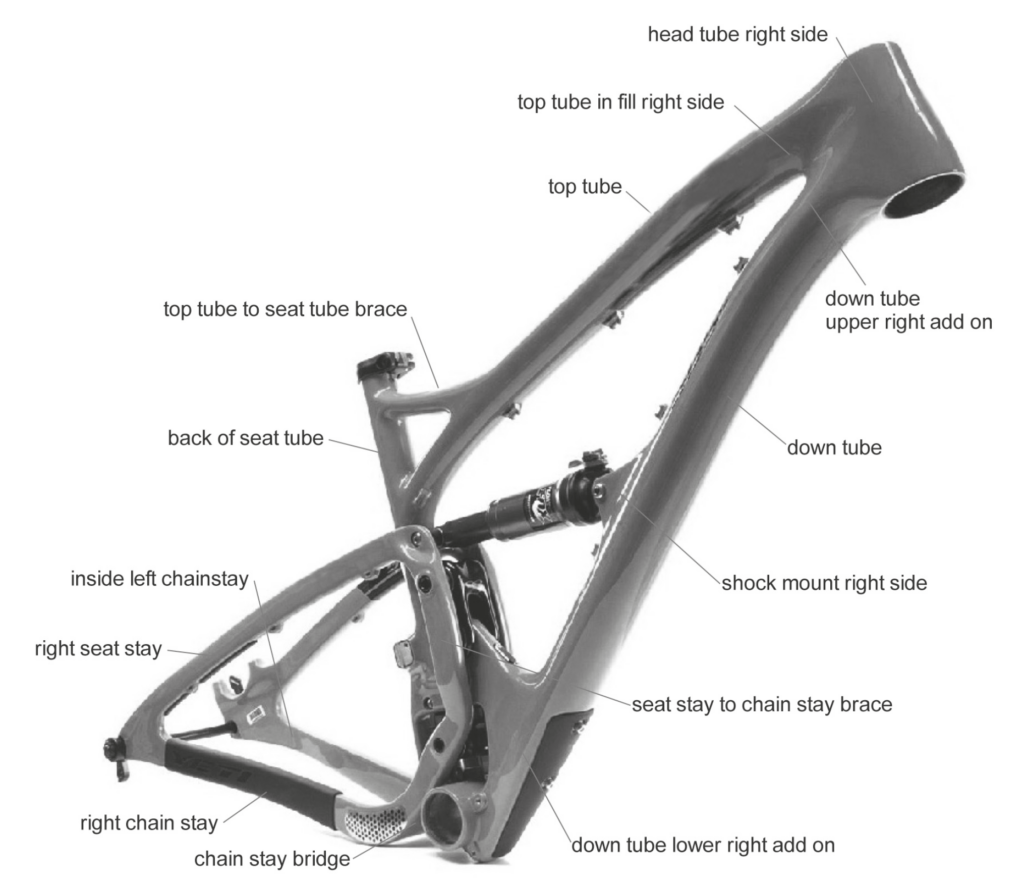
Frame Part Location Guide
Some parts indicated in the diagram may not be applicable to your kit